Introduction

This document describes the Call Center software platform. This software is based on a modified version of the off-the-shelf tool known as Remedy.

The document is divided into three main sections:

  • Call Flow - describes what happens when a Juno user phones Juno with a probem. This includes:

    • Ticket Creation - describes how a Customer Service Representative (CSR) creates a ticket through Remedy when a user calls the help desk.

    • Ticket Modification - describes how the CSR inputs data which describes the caller's problem once a ticket has been created.

    • Ticket Escalation - describes how the ticket is sent to a more senior person if the CSR is unable to solve the problem.

  • System Administration - describes the infrastructure for maintaining the Call Center platform. The topic is covered from both a user perspective, and a data perspecitive. This includes:

    • User Administration - describes how Juno maintains the databases where information about the Remedy users (agents) is stored.

    • Archiving - describes how ticket information is backed up after sixty days.

  • Miscellaneous

    This section describes various system enhancements. This includes:

    • CSR (Customer Service Representative) Signup which describes what happens when someone calls a CSR in order to signup for service.

Call Flow

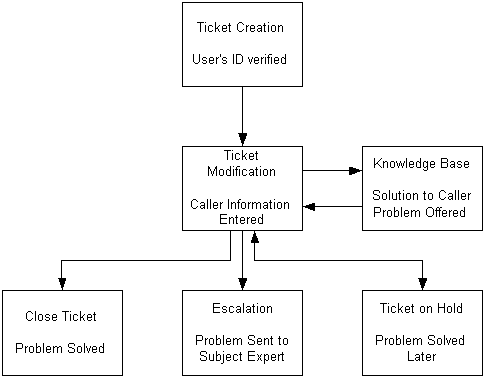
A user who calls a Customer Service Representative (an agent) with a problem initiates the following process:

  • the agent creates a ticket,

  • the agent fills in the ticket with data describing the problem (also known as ticket modification).

  • Once the data is filled in, the agent interacts with an application called Solution Explorer which helps him/her come up with the appropriate solution to the caller's problem.

  • The ticket is closed once the agent solves the problem.

  • If the agent is unable to solve the problem s/he either puts the ticket on hold - to be solved later, or,

  • escalates the ticket to another agent with more expertise.

This process is reflected in the following diagram:
The rest of this section describes ticket creation, modification and escalation in more detail.

Ticket Creation

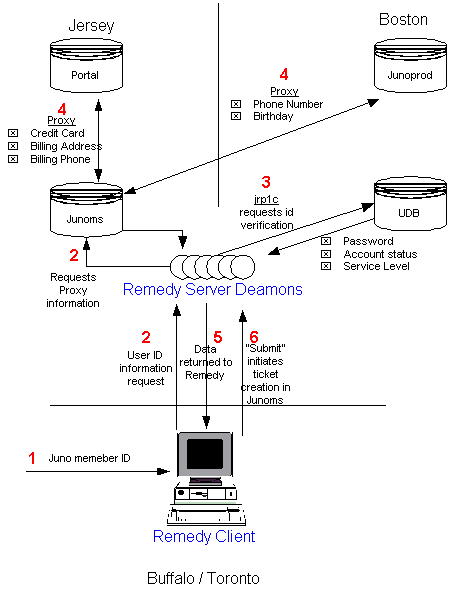
The following diagram and description present how a ticket is created after a help desk caller's ID is established.

  1. A caller gives his/her ID (email address) to the helpdesk. The helpdesk agent enters this information into Remedy and presses return [enter].

    Note: a member's ID is his/her email address. When a non-member phones, the helpdesk agent uses the caller's last name, first name and phone number as an identifying ID.

  2. The Remedy Client sends a message to the Remedy Server in New Jersey. These deamons field all the requests coming in from all the agents.

  3. A Remedy deamon launches protocol jrp1c which looks up the user ID on the UDB.

    The UDB returns the user's Password, Account Status and Service Level. This information is stored in the ms database. Later, using the user ID as a handle, Remedy requests all the data received from the UDB.

    In the event that the UDB does not return any information, Remedy concludes that the caller is not a member and sends an appropriate code back the the Remedy Client.

    Note: The Remedy Client can only receive data from a relational database via Remedy servers. A program can only return a status code. As a result, there is no easy way to get data back to the Remedy Client when one of the server deamons runs a process that is not a database command. The solution is to load this data into a ducktape table in the ms database, then grab everything on the ducktape at the end of the process and bring it back to the Remedy Client.

  4. A stored procedure in ms (rem_User) contacts prod and Portal. through a proxy table that is set up in the ms. PROD returns the user's phone number and birthday, Portal returns the user's credit card number, billing address and billing phone.

  5. All data is returned to the Remedy Client.

  6. The agent verifes the caller's ID, and presses submit. The ticket is created.

Ticket Modification

Ticket creation is followed by ticket modification. Ticket modification occurs when the agent fills in the ticket's fields to determine the nature of the problem. Note that the ticket has different required fields depending on whether it is a Customer Support, or Techical Support problem.

Once the ticket is completely filled out, the agent sends the data to the Solution Explorer software - a dynamic interactive tool which provides the agent with various solutions to the particular problem. After the agent is satisfied with a particular solution s/he presses the "Retieve" button to insert a solution ID into ticket.

If the agent cannot solve the problem with the Solution Explorer, s/he either escalates the ticket, or puts the ticket on hold.

Escalation

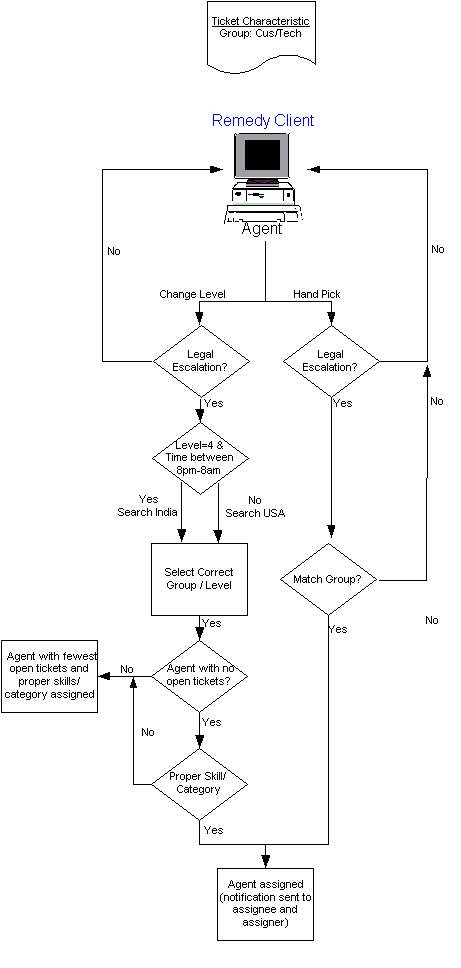
Agents who are unable to handle a particular problem can send the ticket to another agent who does have the ability to handle the problem. This is known as escalation. (Note: this is different from the Remedy product feature also known as Escalation). There are a number of ways for an agent to escalate a ticket using Remedy. These are:

  • Change the level (Agents belong to the following levels: 1- Technical/Customer Service Representative, 2 - Product Specialist, 3 - Supervisor, 4 - Customer Support Staff, 5 - Management).

    Upon changing the level, the Remedy backend (found in ms) checks if the agent is authorized to escalate to that level. If they agent is not authorized, s/he is informed that this is not a legal escalation. If the agent is authorized, the system looks for an agent with no assigned tickets belonging to the proper group (Customer Service or Technical Support) and with the proper skills to handle the problem.

    If there are no agents without any tickets assigned to them, the system looks for an agent with the fewest assigned tickets and the proper category/skills match. In the event that there is no proper category/skills match, the problem is escalated to the agent with the fewest assigned tickets.

    An email confirming the escalation is sent to all agents involved in the escalation.

  • Handpick a person. The system allows an agent to handpick the person to whom the problem will be escalated after checking that it is a legal escalation (agents can only choose a person at a valid escalation level who belongs to the proper group).

The following flowchart depicts the different escalation checks performed by Remedy:

System Administration

User Administration

User Data Tables

All data about Remedy users (these are Call Center agents and staff(primarily Member Services)) is stored in four tables. Two of these are created by Remedy itself. The other set has been developed by the company to help meet its unique needs. uses data from all of these tables to identify and store information about its Remedy users.

The two Remedy tables are:

  • User_x - This table holds all the data entered through the Remedy system. This includes, login name, password, status, entry id, group list, full name, licence type, default notify mechanism, address, creator, last modified date, and create date.

  • user_cache - This table contains a copy of the fields in User_x, with an additional field to hold the name value of the group(s) that an agent belongs to.

The two tables are:

  • USER_GROUP_LEVEL - This table contains each agent/user's user name, group number (701 (technical support), 702 (customer service), 703 (internal), 1(administration)), skill level (1-5), whether or not s/he can take phone calls, whether or not s/he can get email, whether or not s/he can receive escalations. These fields are labeled User Name, Group Number, Skill Level, Phone, Email, Get tickets, Office).

    User-skill - This table contains the user name, and skills (what skills they have).

Table Updates

The company has created proprietary tools for creating and updating the data in these tables. The tools are available in two different interfaces:

  1. Intranet-based
  2. Interactive
    • addUser - to add a user to the data tables.
    • modUser - to modify a user on the data tables.
    • delUser - to delete a user from the data tables.
    • massAddUser - to add a number of users to the data tables at a single time.
    • massModUser - to modify a number of users on the data tables at a single time.
    • vrfystats - to view the statistics for a particular user.
All of these tools run off a common module called User-admin.pm.
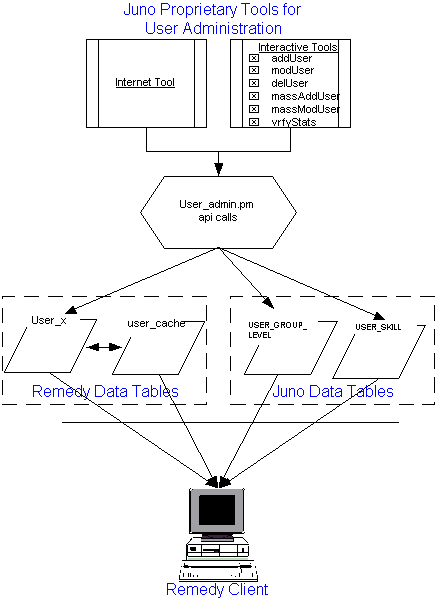
The following diagram provides a visual representation of the User Administration System.

Miscellaneous

CSR (Customer Service Representative) Signup

Overview

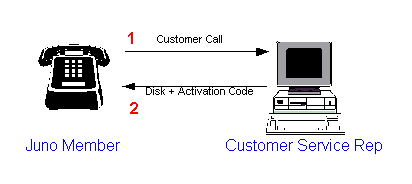
CSR Signup takes place when a potential member contacts a CSR in order to signup for service through an 1-800 phone number. In return for providing his/her billing and shipping information, the customer receives an installation disk with a unique activation code already burned on.

Two benefits of this procedure are:

1) It simplifies the signon process by providing the company with user information that would otherwise be entered during installation.

2) The activation code can be used to measure various user demographics if the disk is used to signup other users.

The CSR Graphical User Interface

This is the screen the Customer Service Representative works with while speaking with a customer.

Field Description
MPV Marketing Plan Vector. Lists the different plans available to the caller. The CSR selects the desired plan from a drop down menu. Required.
Billing Information - to whom the bill will be sent.
First Name The customer's first name. Required.
Middle Initial The customer's middle initial. Optional.
Last Name The customer's last name. Required.
Address 1 The customer's street address. Required.
Address 2 Additional address information (ex: apartment number). Optional.
Shipping Information - where the disk will be shipped.
First Name The customer's first name. Required.
Middle Initial The customer's middle initial. Optional.
Last Name The customer's last name. Required
Address 1 The address to which billing information will be sent. Required.
Address 2 Additional address information (ex: apartment number). Optional.

Once the CSR presses "Submit" after entering the information, the system checks to see that all fields are properly filled in. The CSR receives a message if there are any errors. If everything is okay, the system generates an activation code which is then planted on the disk before it is sent to the user.

Searching Fields

In the event that a user calls back, the CSR can bring up that user's information by typing the user's data in a valid search field and pressing return. Valid search fields are:

  • Activity Code
  • Credit Card
  • Day Phone
  • Evening Phone

Pressing the "Search" button initiates a search on all fields with data in them and brings up the record with that exact data in it (as if an "AND" operation had been run on all the fields with data).

The Process

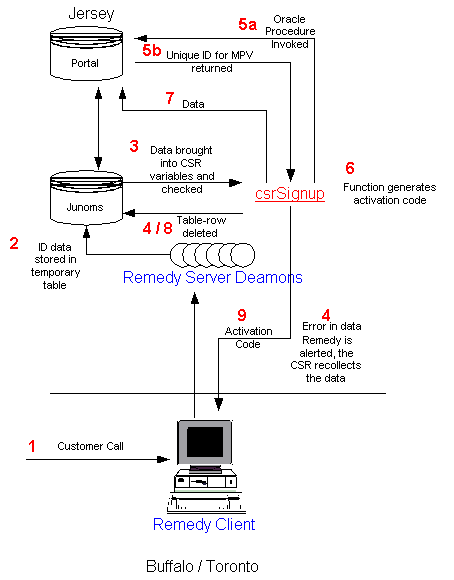
This is what happens from the time the customer's call comes in to the time the disk goes out:

  1. The customer's call comes in. The CSR enters the caller's personal data and presses submit.

  2. Remedy puts all fields with input data in a Sybase table located in ms. Within this table, the data is placed in a single row identified by a unique number.

  3. The Remedy deamons invoke the csrSignup process. As part of the invocation process, the deamons pass along the unique number (ID) which identifies the row in the table where the data is stored.

    csrSignup takes this ID, goes to the table, selects everything in the row and stores them in csrSignup's global variables.

    csrSignup checks that the values of all the variables are non-null and valid.

    Specific checks performed by csrSignup include: no missing fields, phone numbers are entirely numeric, the credit card is valid, FUSA checks, the credit card expiration date is valid.

  4. If any of the data is found to be incorrect: A) Remedy is notified. B) All entries in the table are deleted. C) CSR tries to get the proper information (Go to 1).

  5. If the data is found correct: A) csrSignup invokes an Oracle procedure which, B) generates a unique ID number for the particular MPV function (this is the next sequential number for the MPV).

  6. Using this ID, a function is called with generates an activation code.

  7. All the user information, including the activation code is inserted into tables in the Portal billing system. The tables are named:

    juno_t
    juno_acode_info_t
    juno_acode_cc_t
    juno_acode_nameinfo_t
    juno_acode_phones_t

  8. The associate row in the JUNOMS table is deleted.

  9. The activiation code is sent back to Remedy and the CSR alerts the user to expect the installational disk in a couple of days.

Archiving

Overview

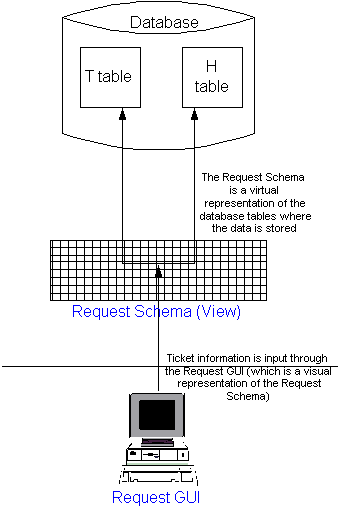
Every time an agent opens a ticket s/he uses the GUI to create an entry in the Request Schema. The entry has attributes such as category type, sub-type, work log, solution, and current assignee that the agent modifies. Remedy takes the schema and maps it to a variety of tables in the database.

Eventually, the tables grow so large they become cumbersome. New ticket creation and ticket searches are slowed.

This problem is solved by archiving tickets over 60 days old.

The rest of this section describes the archiving process.

Archiving Issues

Implementation

Remedy calls an API to generate a Request ID the first time a ticket is created. The entry (the Request ID along with the data collected by the agent) is placed in the Request schema. Since Remedy manages the database for its users, the backend T & H table handling is hidden.

Problems arise because Juno would like to use the same Request ID as a lookup key for archived data.

Since it would be impossible to keep the Request ID unchanged if Remedy were to handle the archive process (Remedy would automatically generate a new Request ID while archiving the data), The company must manually insert the archived data into the T and H tables - all the while remaining careful to touch everything that Remedy would have touched.